移动设备上使用opencv 1.10做图像识别的例子 .
本文共 6146 字,大约阅读时间需要 20 分钟。
本文来自 ,引用必须注明出处!
上次说到了如何,这次就说说如何在WM手机上使用裁剪移植后的Open1.10的例子,在opencv上使用OpenSURF(OpenSURF在GoogleCode的地址:),先来看看本文程序运行的截图:
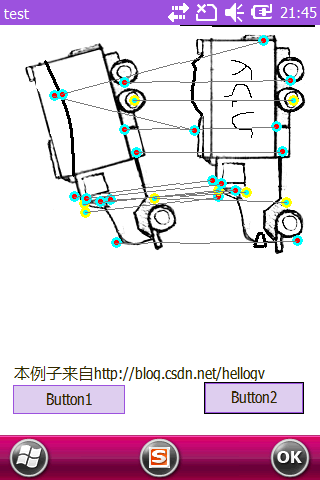
左图为SURF算法找出的特征点,右图为两个图像相似特征点的匹配。
本文的代码可以到这里下载,代码里包含了自己实现的MyHighGUI类,用于转换/绘制/保存IplImage图像,也包含了同时支持WINCE/WIN32的第三方BMP操作类库----DIBSectionCE类(详见),接下来就贴出部分操作代码:
- //*****************************************************************
- //取得程序当前文件夹路径
- //****************************************************************
- CString GetCurrentDirectory()
- {
- wchar_t pBuf[256];
- GetModuleFileName(NULL,pBuf,sizeof(pBuf)/sizeof(wchar_t));
- CString strPath(pBuf);
- strPath = strPath.Left(strPath.ReverseFind('//') + 1);
- delete pBuf;
- return strPath;
- }
- void CtestDlg::OnBnClickedButton1()
- {
- //自定义的HighGUI,详见MyHighGUI.h
- MyHighGUI gui;
- //网上的BMP操作类,支持WINCE/WIN32,地址:http://www.codeguru.com/cpp/w-p/ce/bitmapsandthegdi/article.php/c3
- CDIBSectionCE ce;
- //step1:读取BMP,并转换为IplImage格式
- CString bmpPath=GetCurrentDirectory()+L"car1.bmp";
- ce.Load(bmpPath);
- int nChannels = ce.GetBitmapInfo()->bmiHeader.biBitCount /8 ;
- IplImage* img = gui.BMP2Ipl((BYTE*)ce.GetDIBits(),ce.GetWidth(),ce.GetHeight(),nChannels);
- ce.DeleteObject();
- //step2:提取图片中的特征点
- IpVec ipts;
- surfDetDes(img, ipts, false, 3, 4, 2, 0.0004f);
- // step3:画出特征点
- drawIpoints(img, ipts);
- gui.Show(img,::GetDC(this->m_hWnd),0,0,img->width,img->height);
- //gui.WriteBmp(L"img33.bmp",(BYTE *)img->imageData,img->imageSize,img->width,img->height);
- img=NULL;
- }
- void CtestDlg::OnBnClickedButton2()
- {
- //自定义的HighGUI,详见MyHighGUI.h
- MyHighGUI gui;
- //网上的BMP操作类,支持WINCE/WIN32,地址:http://www.codeguru.com/cpp/w-p/ce/bitmapsandthegdi/article.php/c3
- CDIBSectionCE ce;
- //step1:读取BMP,并转换为IplImage格式
- CString bmpPath=GetCurrentDirectory()+L"car1.bmp";
- ce.Load(bmpPath);
- int nChannels = ce.GetBitmapInfo()->bmiHeader.biBitCount /8 ;
- IplImage* img1 = gui.BMP2Ipl((BYTE*)ce.GetDIBits(),ce.GetWidth(),ce.GetHeight(),nChannels);
- ce.DeleteObject();
- bmpPath=GetCurrentDirectory()+L"car2.bmp";
- ce.Load(bmpPath);
- nChannels = ce.GetBitmapInfo()->bmiHeader.biBitCount /8 ;
- IplImage* img2 = gui.BMP2Ipl((BYTE*)ce.GetDIBits(),ce.GetWidth(),ce.GetHeight(),nChannels);
- ce.DeleteObject();
- //step2:提取图片中的特征点
- IpVec ipts1, ipts2;
- surfDetDes(img1,ipts1,false,4,4,2,0.0002f);
- surfDetDes(img2,ipts2,false,4,4,2,0.0002f);
- //step3:特征点匹配
- IpPairVec matches;
- getMatches(ipts1,ipts2,matches);
- //step4:画出匹配的特征点,并且连线
- for (unsigned int i = 0; i < matches.size(); ++i)
- {
- drawPoint(img1,matches[i].first);
- drawPoint(img2,matches[i].second);
- int w = img1->width;
- cvLine(img1,cvPoint(matches[i].first.x,matches[i].first.y),cvPoint(matches[i].second.x+w,matches[i].second.y), cvScalar(123,123,123),1);
- cvLine(img2,cvPoint(matches[i].first.x-w,matches[i].first.y),cvPoint(matches[i].second.x,matches[i].second.y), cvScalar(123,123,123),1);
- }
- //画到屏幕上
- if(img1->height>img2->height)
- {
- gui.Show(img1,::GetDC(this->m_hWnd),0,0,img1->width,img1->height);
- gui.Show(img2,::GetDC(this->m_hWnd),img1->width,img1->height-img2->height,img2->width,img2->height);
- }
- else
- {
- gui.Show(img1,::GetDC(this->m_hWnd),0,img2->height-img1->height,img1->width,img1->height);
- gui.Show(img2,::GetDC(this->m_hWnd),img1->width,0,img2->width,img2->height);
- }
- }
用户可以根据本文的操作代码,在WINCE/WM平台上实现更多Opencv例子,不过,本文程序跑起来很慢(我用的是460MHz的K3方案 WM手机),因为只用标准C的Math做运算处理。在ARM9+DSP或者ARM11等手机上使用Opencv,建议在Opencv的运算部分用上这些手机的专用运算指令,这样可以大大提高运算速度。
转载地址:http://wwyob.baihongyu.com/
你可能感兴趣的文章
poj 3331 The Idiot of the Year Contest!
查看>>
poj 3233 Matrix Power Series
查看>>
poj 3070 Fibonacci
查看>>
poj 1656 Counting Black
查看>>
BestCoder Round #28
查看>>
poj3299 Humidex
查看>>
poj2159 Ancient Cipher
查看>>
poj1083 Moving Tables
查看>>
poj2255 Tree Recovery
查看>>
zoj 1745 Are We There Yet?
查看>>
UVA100 The 3n + 1 problem
查看>>
hdu1754 I Hate It
查看>>
hdu 1166 敌兵布阵(求区间的和,单节点更新)
查看>>
hiho一下 第四十四周 题目1 : 博弈游戏·Nim游戏
查看>>
poj2299 Ultra-QuickSort(线段树计数问题)
查看>>
hdu4565 So Easy!(矩阵快速幂)
查看>>
poj2528 Mayor's posters(线段树,离散化)
查看>>
线段树多lazy-tag(两个)
查看>>
hdu4578(三个更新操作,三个求值操作)
查看>>
并查集(初级)小结
查看>>